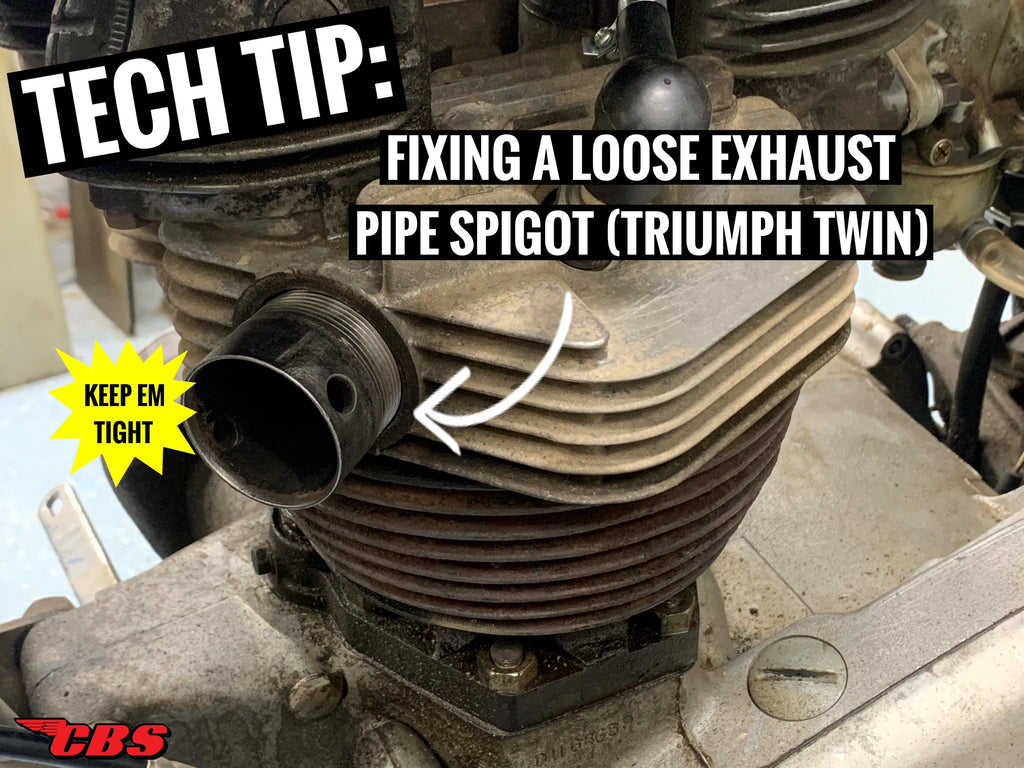

Tech Tip: Fixing A Loose Exhaust Pipe Spigot (Triumph Twin)
Today I will be covering a new Tech Tip post in regards to a loose exhaust pipe spigot adapter based on a recent experience
Should you have encountered a problem in which your spigot came loose in your cylinder head, perhaps my fix will be valuable to you
Keep reading below...
What happened?
Over the weekend I removed both my exhaust pipes on my “Trusty Rusty” 1968 Triumph TR6R only to find that exhaust port #2 spigot had worked loose
As I was “wiggling” the exhaust pipe off, I noticed that the spigot was moving in the same direction as the header pipe
For those that have encountered a “loose spigot” in your cylinder head, I’m sure you know that feeling you get; an instant drop in your mood as you begin to check for damage
For this particular situation I remained confident as my pipes, mufflers and brackets always remained tight and secure which prevents damage from occurring
The discovery

Once my exhaust pipe was removed, I unthreaded the spigot and checked the quality of the threads for any damage
What I saw was not alarming by any means..
Since the pipes were off, I checked the exhaust pipes and found that the exhaust was burning rather nice - no oil residue which was nice too see (although I was not experiencing any burning oil issues to begin with…)
I cleaned both the spigot and cylinder head threads off with carb cleaner and a brush to begin a thorough inspection
Couple problems
Loose exhaust spigots plague vintage Triumphs, most can be fixed quickly on the bike and some require an oversized spigot or that the head be removed and then bored and re-tapped on a mill
I threaded my exhaust spigot into the port and noticed some “slop” from the adapter
Depending on the machine work and tolerances, the “slop” or “play” I felt could be how it was from the factory or simply because the spigot and or head had some wear
The second problem I found which I believe is the reason the spigot came loose is that the spigot was not properly seating on the shoulder inside the port
In fact, looking inside the port with a mirror I found that the spigot was indeed too short to begin with..
For this particular case, I needed to make a longer spigot, and also improve on the thread engagement
Why spigots work loose
Let’s take a look a little deeper as to why spigots come loose

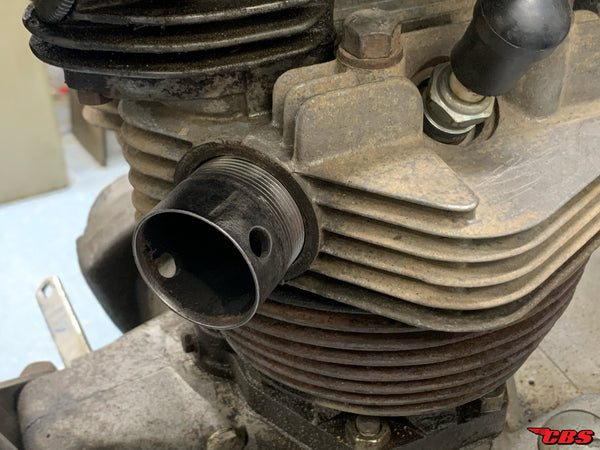
Pictured is an original triumph exhaust pipe spigot, notice that the very end (arrow) shows an undercut, that is to allow the spigot to fully thread in the exhaust port and bypass the bottom taper cut into the threads by a tap

When a Triumph cylinder head was machined, the factory used a “bottoming” tap which has a few tapered and non-formed threads (see above photo)
That “taper” or portion with a lack of threads is exactly why the spigot needs to have an undercut to be able to pass the tapered threads and meet / bottom out with the shoulder face to get the maximum load on each thread
Also, when the spigot is not made to the proper length or feature the correct undercut the spigot could bottom out on the tapered threads internally or stop at at the end of the spigot due to a lack of thread reach
Mind you that installing “new” spigots may not fix your problem as each head is machined slightly different - some may have deeper ports which require a longer spigot
3 key elements to achieve a tight spigot

There are 3 major factors you need to know to help achieve a tight spigot that will not back out
- Undercut at the beginning of the threads
- Spigot must be the right length
- Good thread engagement
If you have all 3 factors above, then you should be able to achieve a tight spigot that will not come out under normal riding conditions
Fixing my problem
As I explained my problem and why spigots work loose, I came to the conclusion that I would have to make my own spigot for exhaust port #2
My “off the shelf” spigots are the same as my original that came out of the head which will not help me address the current issue at hand
Below I will go over my solution..
Step #1 - Measuring depth

I grabbed my Starret depth micrometer and measured how deep the shoulder is to the face of the head
The outside face will be parallel to the shoulder face inside the port
Doing this measurement will inform me of how long I need to make the spigot and how long the threads need to be cut on the spigot
In this particular instance the depth is .877” which is close to 7/8”
Step #2 - Making the spigot

Now that we have the depth recorded, we must get ready to cut threads
The stock I’ll be using is 1018 steel hollow tube that will need to be machined in the ACRA lathe
We will machine the spigot with a goal of 5 dimensions we must achieve
- 1 5/8” OD for threads
- 1.650” OD for exhaust pipe cup
- 3/4" for the spigot length protrusion (outside the head)
- 1 3/8” ID
- 16 TPI
Once done with turning, boring and cutting threads we will bore (2) 1/2” holes inline on my mill to accept my installation tool that I will show further below..
Step #3 - Checking contact

Now that the spigot is ready to rock-and-roll, I like to check that the spigot is making contact with the shoulder inside the port before locking the spigot in place
You can use dye, sharpy or rely on the carbon to view any rubbing or witness marks
In this case we used the carbon residue
If the spigot is not making contact and the length is correct, go to the lathe an add either a deeper undercut or wider undercut to get pass the tapered threads we talked about earlier
Step #4 - Installation

Taking the time clean all surfaces and threads, I add a little bit of anti-seize to prevent any gauling or seizing of the spigot
I then use my custom spigot “heavy duty” installation tool to lock the spigot in place
The tool I designed allows me to really torque down on the spigot using an 1 1/4” wrench
There is a 3/8” OD hardened and ground pin that slides through the tool and spigot to drive the spigot
FYI - some folks have recommended to use green Loctite bearing retainer. I do understand that loctite does have a heat threshold, but a little loctite doesn’t do any harm for added security should it make you feel more comfortable
Work is complete

Here is the new spigot in the cylinder head ready to go
Based off how tight the spigot is in the head (along with the good contact area) this spigot will not back-out under any application and I will consider it a permanent fix
I hope this post will help someone along the way
Thanks for reading
Thanks for reading todays post
Click here for more blog posts like this one
Should you have any questions, please drop us a comment using the comment section below
Ride safe!
John Adamick
Kyle,
Thanks for the outstanding article re. exhaust spigot fabrication and replacement. I think this is a problem that every Triumph owner will eventually be faced with. Two questions that perhaps you could help with:
1. For a long time it’s been my understanding that the factory threads were not standard fit, but were close tolerance. Do you know if this is correct?
2. Do you know if there is a proper torque value applicable when installing the spigots?
Thanks not just for this article but for all the outstanding tech article you write. The generous use of photos is very helpful.
Best regards,
John Adamick
Classic British Spares
@Jerry – I believe they are 60 degree
@Carl – Anytime! Thanks for reading
Carl deroo
Thank you kyle i copied your tool very useful information
Jerry Walters
Thanks for the informative article! I do have one question: Are the 1 5/8"-16 threads 55 degree Whitworth or 60 degree UN?
Classic British Spares
@Dale – thank you for the kind words Dale!
@Dave – Thank you for reading and commenting Dave. To answer your question yes, the tube is thicker in the center, original spigots feature a tapper on both sides of the ID I assume to assist with flow. My ID is 1 3/8 all the way and I decided not to make a taper. The ID transitions nicely through the spigot without any “walls” for air to be stopped by. Could it make a difference, I would say its possible, for my standard road bike I would think no. But not 100% on that! I will be doing plug checks and I will check the state of tune for any changes.